
How to Set Up Cookie Consent in PrestaShop at Checkout

A payment cookie isn’t automatically exempt just because it appears at checkout. For EU and UK visitors, non-essential cookies require prior opt-in consent. What matters is what each cookie does, not when it appears. This PrestaShop cookie compliance guide shows how to distinguish checkout functions from analytics and advertising tracking.
It’s easy to assume that every cookie used during payment is essential to completing an order. But checkout may also load measurement or advertising tools, so clear categories and consent timing matter. Visitors need understandable information about cookie purposes and storage, along with a meaningful choice about non-essential tracking.
Learn how to identify payment-related cookies, configure consent so optional scripts wait for a visitor’s choice, and make cookie information clear. These steps also help keep consent choices consistent throughout the shopping journey, including at checkout.
Key Takeaways
- Decide whether a checkout cookie is essential by looking at its purpose, not simply where it appears.
- Configure consent so non-essential analytics and marketing tags wait until visitors make a choice.
- Explain cookie purposes and storage clearly, and make consent preferences easy to manage.
- Account for different privacy rules when serving visitors in the EU, UK, and US.
- Use a consent platform to manage consent choices and assess how banner changes affect user response and revenue.
GDPR and ePrivacy consent requirements
For EU and UK visitors, obtain prior opt-in consent before using non-essential cookies. Choose a PrestaShop consent module that explicitly covers GDPR, ePrivacy, and CCPA/CPRA requirements.
Set up consent before checkout scripts run, then test what loads both before and after a visitor makes a choice.
-
Add the Consent Script to the Theme Head
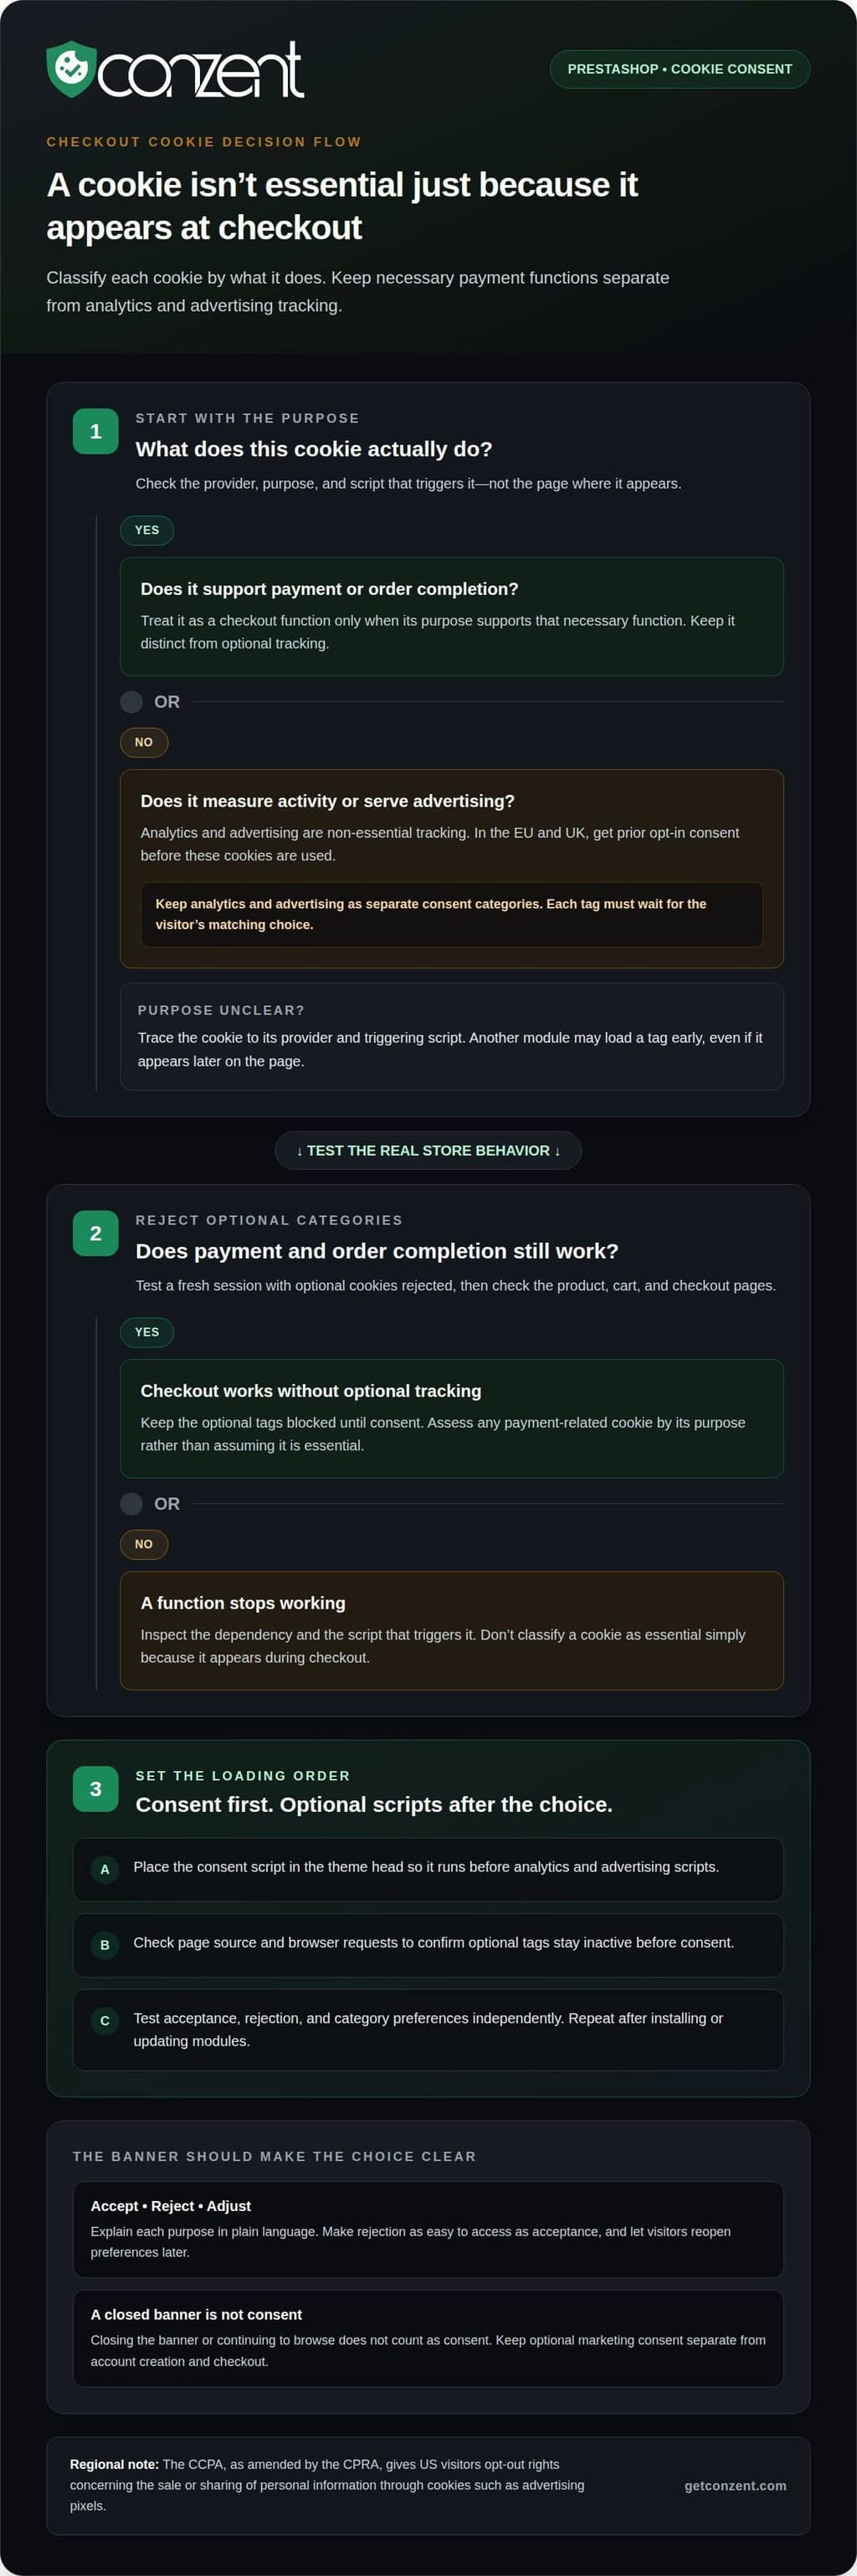
Add the consent script to your theme’s head template so it runs before analytics and advertising scripts. Check the rendered page source and browser requests to confirm the loading order. Test a fresh session: reject optional cookies, then record which cookies or requests still appear. Repeat these checks after installing or updating modules.
Keep an inventory of each cookie, its provider and purpose, and the script that triggers it. Trace an analytics cookie to its tag rather than assuming the banner controls it. Another module may inject a script early, even if it appears later in the page.
-
Configure Analytics and Advertising Consent
Separate analytics and advertising in your consent settings. Identify each tag’s purpose, then configure it to wait for the matching choice. Accepting advertising cookies, for example, must not automatically authorize an analytics tag. Test both categories independently on product, cart, and checkout pages.
Consent under GDPR Article 7 must be freely given, specific, informed, and unambiguous. Make the category labels explain the actual use. If you use Google tools, configure their consent behavior to reflect the visitor’s choice. A consent-management feature does not replace checking each tag’s trigger conditions.
-
Require Consent Before Installing Cookies
Block non-essential cookies until the visitor gives explicit consent. Article 5(3) of the ePrivacy Directive requires prior consent before non-essential cookies are placed on a visitor’s device. Load the consent script first, and verify that analytics and marketing scripts remain inactive before a choice.
Keep necessary checkout functions separate from optional tracking. A payment-related cookie isn’t automatically essential just because it appears during checkout. Review its purpose and behavior, then test whether payment and order completion still work when optional categories are rejected.
-
Configure Banner Consent and Preferences
Let visitors accept, reject, or adjust optional categories. Explain each purpose in plain language, and make rejection as easy to access as acceptance. Provide a way to reopen preferences so visitors can change their choice later. Closing the banner or continuing to browse does not count as consent.
Use separate, unticked consent boxes on customer forms for optional marketing. Don’t bundle marketing consent with account creation or checkout. The CCPA, as amended by the CPRA, gives US visitors opt-out rights concerning the sale or sharing of personal information through cookies such as advertising pixels. Configure the banner to present the relevant choice.
Test the module against each framework it claims to support. Confirm that its settings accommodate GDPR and ePrivacy opt-in choices as well as CCPA/CPRA opt-out rights. A framework label alone doesn’t show how a banner behaves. Test acceptance, rejection, category preferences, and the resulting scripts on your store.
Legal compliance, customer trust, and user experience
Record each consent choice, including its timestamp, selected categories, and banner version. For access, export, or deletion requests, identify relevant customer records and document the action taken.
-
Store, Document, and Withdraw Cookie Consent
Configure your consent manager to retain the visitor’s choice, selected categories, and the banner version shown. Keep those records available for review, and provide a visible way to withdraw consent or change preferences. Test withdrawal in a fresh browser session: optional tags should follow the updated choice, not continue using earlier permission.
Route customer data access, export, and deletion requests through a defined workflow. Match each request to the relevant account and order records, then record what was accessed, exported, or deleted. Keep cookie consent records separate from customer profile data, as they serve different purposes and need different handling.
-
Review Non-Compliance Risks and Penalties
Assess the risk by checking whether optional tracking runs before consent, whether the banner records choices, and whether withdrawal takes effect. According to the European Union, the GDPR can impose fines of up to 4% of global annual revenue for violations. Treat that exposure as a reason to test actual behavior, not just review a module’s settings.
Consider the effect on customer trust, too. If a visitor rejects marketing cookies, advertising tags should not continue firing. Test the rejected choice on product, account, and checkout pages, then compare browser requests with the recorded preference. Document any mismatch and fix the responsible trigger or integration.
-
Check Google Consent Mode and Tag Behavior
If your store uses Google Ads or Analytics, align tag behavior with the visitor’s consent choice. Google Consent Mode communicates consent signals to Google tags; it doesn’t replace consent where required. Test accepted and rejected states separately, and check that settings match the purposes explained in your banner.
Review the tag manager after changing modules or campaign settings. A new integration may introduce a script that bypasses existing controls. Record each tag’s owner, purpose, and consent category so the person managing campaigns can see what needs review.
- Make the request process easy to follow. Publish a clear privacy contact route, and give staff a simple record of the request, customer account, actions taken, and completion status. For an export, include relevant customer data, not cookie identifiers from a separate consent record.
Use a regular review to catch outdated tags and stale records. Compare the live store with the documented inventory after theme edits, module updates, and campaign changes. If you’re comparing deployment options for consent management, review consent platform pricing details as part of that decision.
EU cookie law configuration
Configure your PrestaShop store around visitor choices, clear purposes, and consistent behavior. Use this PrestaShop cookie compliance guide as a working reference when reviewing each language, page template, and integration.
- Map your store’s cookie activity before adjusting settings. Review the active theme, installed modules, tag manager, and checkout integrations. Record each cookie or script, its purpose, and where it appears. A payment integration, for example, may run at checkout, while analytics may load across product pages.
Separate cookies needed for a requested store function from analytics and advertising tools. This inventory helps you identify which scripts consent settings must control. Update it as tools change instead of relying only on the module list in your PrestaShop back office.
- Explain each purpose clearly in the banner. Separate analytics and marketing instead of grouping them under a broad “optional” label. Describe what each category does and which tools it covers. Keep the wording aligned with the scripts installed on your store, so visitors can make an informed choice.
Review the banner on product, cart, account, and checkout pages. If it appears on the homepage but not during checkout, visitors may see inconsistent consent information during the same shopping journey.
- Set the banner language to match the selected storefront language. Review translated category names, buttons, and preference details, not just the opening message. A translated rejection control, for example, should clearly reject optional categories. Keep each language version consistent with the purposes and settings in PrestaShop.
Test the banner on desktop and mobile. Make sure accept, reject, and preference controls remain visible and understandable without obscuring checkout information.
- Test how the consent module interacts with server-side and browser-based features. A server request or tag manager can still trigger a script that places cookies in the browser. In a test session, reject optional categories, then inspect browser requests and cookie storage on product and checkout pages.
Test an analytics-only choice, too. Advertising integrations should follow the visitor’s selection independently. Record any mismatch between the saved preference and the scripts that run, then fix the relevant trigger or integration.
- Repeat your configuration tests after a PrestaShop version change, theme edit, or module update. Each can affect when scripts load or where the banner appears. Recheck the cookie inventory and compare browser behavior with the purposes shown to visitors.
Keep this PrestaShop cookie compliance guide current as you add payment methods, analytics features, or advertising integrations. If a tool uses personal data for a new purpose, update its explanation and consent category before relying on the existing configuration.
GDPR and cookie transparency requirements
Make cookie explanations match what your PrestaShop store actually does. Connect your tracking inventory, consent records, and visitor-facing information with these steps.
- Inventory the cookies and tracking tools used across your store. Record each provider, purpose, cookie name, and storage duration. Include PrestaShop modules, analytics tags, advertising pixels, and checkout integrations. A tag measuring product visits, for example, needs a clear purpose in your inventory, not a generic “site improvement” label.
Compare the inventory with your cookie banner and privacy information. Remove outdated entries and add new tools before they collect data. Visitors should be able to understand each category without decoding a vendor name or technical identifier.
- Explain each cookie category and tracking purpose clearly. State what information a tool uses, why it runs, and how long its cookie remains stored. Avoid broad phrases such as “improve your experience” when the actual purpose is advertising measurement or analytics.
Use consistent explanations in the banner, preference panel, and privacy information. If the banner calls a category “analytics,” don’t describe the same cookies as advertising elsewhere. Consistent language helps visitors make an informed choice.
- Check every translation shown to European visitors. A translated banner must preserve the meaning of category names, purposes, and controls. Review each language version on the live store, including at checkout, where visitors may be focused on completing an order.
Test each language in a real session. Confirm that the banner appears, preferences remain readable, and supporting cookie information is available in that language. A translation that omits a tracking purpose leaves the explanation incomplete.
- Document the consent interface and the behavior behind it. Record the banner version, categories, and changes made after updating a PrestaShop module or analytics integration. Then compare visitor selections with browser activity, so your records reflect actual tracking behavior, not settings alone.
Google requires advertisers using Google Ads or Analytics to implement Consent Mode v2 as of March 2024. Treat consent mode as a signal to Google tools, not as a substitute for explaining tracking purposes or collecting consent where required.
- Use enforcement cases to test whether your records can explain the store’s choices. The CNIL fined Criteo 40 million euros in 2023, partly over processing data without proof of valid consent from websites carrying its trackers. Keep evidence that connects each recorded choice to the tracking activity it allowed.
Review this evidence after changing a banner, script, or module. Confirm that the explanation, consent record, and live behavior still agree. Comparing the three makes transparency measurable and easier to maintain as your store’s tools change.
What cookie consent laws apply to PrestaShop stores in the US, EU, and UK?
Apply cookie settings according to the visitor’s location and the tracking purpose. A PrestaShop store serving these markets needs to distinguish EU and UK opt-in choices from US opt-out rights.
- For EU visitors, identify non-essential cookies and require prior opt-in consent before placing them on a device. GDPR consent must be freely given, specific, informed, and unambiguous. The ePrivacy Directive requires prior consent for non-essential cookies. Configure your banner so accepting one purpose doesn’t automatically enable unrelated analytics or advertising.
Make this distinction clear in the preference panel. Accepting analytics should not also accept marketing tracking. Match each banner category to the cookies and scripts that actually serve that purpose.
- For UK visitors, account for GDPR and PECR when configuring cookie choices. Obtain prior opt-in for non-essential cookies, and explain the purpose before visitors choose. Align UK settings with the tools your store uses. A banner that offers categories but allows all tracking immediately defeats its purpose.
Test the UK visitor experience on product, account, and checkout pages. Confirm that each page presents a meaningful choice and that the selection controls the relevant scripts.
- For US visitors, account for the CCPA, as amended by the CPRA. These laws give visitors opt-out rights concerning the sale or sharing of personal information through cookies, including advertising pixels. Make the relevant opt-out choice clear; an EU-style accept-or-reject banner alone may not effectively communicate this US right.
Check advertising integrations individually. If a pixel shares personal information for advertising, make sure your store’s US-facing controls address that activity. Explain the choice directly instead of relying on a broad “cookie settings” label.
- Set up location-aware choices without confusing visitors who move between regions. Keep each banner version aligned with the applicable choice: prior opt-in for non-essential cookies in the EU and UK, and an opt-out route for the stated US rights. Test the behavior in a clean browser session and record which controls appear.
Review the setup whenever your store adds a market, payment integration, analytics tool, or advertising pixel. Update the cookie inventory and banner explanations together, so visitors see accurate purposes across markets.
Compare consent platform options for managing region-specific choices through consent platform plans.
Conzent: Managed Cloud Consent Platform
Conzent’s Managed Cloud Consent Platform helps PrestaShop teams manage consent banners and visitor choices across their store. It fits when your current setup makes it difficult to coordinate consent settings, test banner changes, or understand their revenue impact.
Choose Self-Hosted Open Consent Infrastructure to run the consent platform on your own infrastructure. Consent A/B Testing lets you compare banner approaches, while Revenue Impact Analytics helps you assess how consent choices relate to revenue. These tools support operational decisions, but don’t replace your responsibility to explain tracking purposes or configure store scripts correctly.
If you’re ready to explore a consent setup that fits your needs, contact Conzent.
Keep Consent Aligned as Your Store Changes
Cookie settings need ongoing ownership, not just a one-time installation. Assign someone to review changes to your PrestaShop theme, checkout flow, or tracking tools. That review can catch a new script before it runs outside the choices your banner explains.
Use this PrestaShop cookie compliance guide as a working reference for updates. Keep a simple change record naming the affected tool, its purpose, and the consent behavior tested. Clear ownership also helps marketing and technical teams coordinate rather than make isolated changes to the same tags.
Build the review into your store’s regular release process. After each change, test the visitor experience in a clean session and confirm that preferences behave as intended. Small, repeatable checks make consent easier to maintain as your store evolves.
If you’re considering a consent platform for that ongoing work, explore consent platform options. A thoughtful process gives your team a clearer path forward and helps keep visitor choices central.
Frequently Asked Questions
Do I need cookie consent for payment gateway cookies at checkout?
It depends on what the cookie does, not the payment provider’s name. A cookie used solely to complete a payment may be necessary for the transaction, while a separate analytics or advertising cookie still needs the applicable consent choice. Test checkout in a clean browser session, comparing cookies before, during, and after payment. Review the gateway’s documentation to identify cookie purposes.
Does a PrestaShop store need cookie consent for analytics, advertising, or essential cookies?
EU and UK visitors must opt in before non-essential analytics or advertising cookies are set. Cookies strictly needed for a function the visitor requests are treated differently, but classify them by their actual purpose, not by the module that installs them. For US visitors, consider opt-out rights involving the sale or sharing of personal information through advertising cookies. Document why each cookie belongs in its category.
How do you block non-essential cookies until a visitor gives consent in PrestaShop?
Load your consent control before scripts that set optional cookies, then configure each tag to require the matching consent choice. In PrestaShop, inspect theme code, tag-manager rules, and modules that may inject scripts independently. Test a fresh session, reject optional categories, and inspect browser storage and network requests. Repeat at checkout, where payment modules may load additional scripts.
Which PrestaShop cookie consent modules support GDPR, ePrivacy, and CCPA/CPRA?
Choose a PrestaShop consent module that explicitly covers GDPR, ePrivacy, and CCPA/CPRA requirements, then test that it handles each framework’s consent choices correctly.